A few months back (wow! has it been that long!) a customer requested having a particular necklace re-created. Her friend had bought it in New York City years ago and she was no longer able to buy that necklace. I got to work searching out similar beads and components and some time after that initial meeting I was able to gather all the necessary supplies to handle this custom request.
Although as I began the project I found no custom job is ever without bumps in the road. It literally took almost two months to actually finalize this necklace but the end result was fabulous!! With a few changes made to the overall design the customer was very pleased and inquired if the necklace could be made in other colors as well!
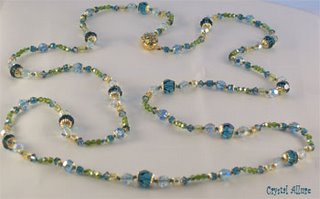 What went into the design of this necklace? Swarovski crystals (of course!), 14k gold-filled bead caps and components, nylon cord and the technique of knotting.
This particular necklace is 45" in length with countless knots between the beads and bead sets. The designer clasp is customizable because you select the crystal rhinestone color you want for your particular design (tip: check out Mimisgems.com for these designer style clasps).
If you are interested in purchasing this necklace or one that is similar to this design, please contact me.
So why knot when doing so is a lot more trouble than simply stringing beads?
• The beads look better. The knots space the beads, allowing you to see each bead better.
• Beaded necklaces (and bracelets) that have been knotted have a more finished and luxurious look.
• If the necklace ever breaks, only one bead will be lost.
• The necklace is less likely to break. The sharp part of the bead hole tends to wear against the reinforced knot, not the thin bead cord.
• Softer bead materials (such as pearls, malachite, or coral) are prevented from rubbing together and abrading the sides of the beads.
General Tips & Tricks:
1. Pre-stretch your cord overnight by tying two light weight keys at either end of the cord and hanging it;
2. You may pre-string all the beads to be knotted all at once (faster method), or you can put them on one at a time (easier for beginners);
3. Use the same knotting technique throughout the design.
Tips on selecting your thread:
Color: (Option 1) Select thread to match the color of the beads -or- (Option 2) Select thread that is slightly darker in color than your focal bead.
Type: Silk is the preferred cord for knotting, especially pearls. Nylon cord will work when a stronger, thicker cord is necessary.
Thickness: Use a thickness of cord that when doubled (2 strands) fits snugly inside your bead. Most beads are drilled with a 1.0mm diameter hole. For soft bead materials such as pearls, silk cord in size E or F works well. For harder materials like black onyx, garnet, or rose quartz, use nylon cord in size 2 or silk in size F for 8mm beads.
Length: You’ll need a length of cord at least four times the length of your finished necklace, for example, an 18" necklace will need at least 4x18"=72" or 6 feet.
On the last two knots either: (1) put a tiny drop of a thin adhesive such as Hypo Tube Cement or (2) clear nailpolish. When dry, carefully trim off the excess cords.
Advanced Techniques:
1. Add bead tips for a clean, professional look
For more information on bead knotting, simply do a search on the internet or shop your local book store for jewelry books using this technique. You won't be disappointed by incorporating this technique into your jewelry designs!
Read More »
Although as I began the project I found no custom job is ever without bumps in the road. It literally took almost two months to actually finalize this necklace but the end result was fabulous!! With a few changes made to the overall design the customer was very pleased and inquired if the necklace could be made in other colors as well!
 What went into the design of this necklace? Swarovski crystals (of course!), 14k gold-filled bead caps and components, nylon cord and the technique of knotting.
This particular necklace is 45" in length with countless knots between the beads and bead sets. The designer clasp is customizable because you select the crystal rhinestone color you want for your particular design (tip: check out Mimisgems.com for these designer style clasps).
If you are interested in purchasing this necklace or one that is similar to this design, please contact me.
So why knot when doing so is a lot more trouble than simply stringing beads?
• The beads look better. The knots space the beads, allowing you to see each bead better.
• Beaded necklaces (and bracelets) that have been knotted have a more finished and luxurious look.
• If the necklace ever breaks, only one bead will be lost.
• The necklace is less likely to break. The sharp part of the bead hole tends to wear against the reinforced knot, not the thin bead cord.
• Softer bead materials (such as pearls, malachite, or coral) are prevented from rubbing together and abrading the sides of the beads.
General Tips & Tricks:
1. Pre-stretch your cord overnight by tying two light weight keys at either end of the cord and hanging it;
2. You may pre-string all the beads to be knotted all at once (faster method), or you can put them on one at a time (easier for beginners);
3. Use the same knotting technique throughout the design.
Tips on selecting your thread:
Color: (Option 1) Select thread to match the color of the beads -or- (Option 2) Select thread that is slightly darker in color than your focal bead.
Type: Silk is the preferred cord for knotting, especially pearls. Nylon cord will work when a stronger, thicker cord is necessary.
Thickness: Use a thickness of cord that when doubled (2 strands) fits snugly inside your bead. Most beads are drilled with a 1.0mm diameter hole. For soft bead materials such as pearls, silk cord in size E or F works well. For harder materials like black onyx, garnet, or rose quartz, use nylon cord in size 2 or silk in size F for 8mm beads.
Length: You’ll need a length of cord at least four times the length of your finished necklace, for example, an 18" necklace will need at least 4x18"=72" or 6 feet.
On the last two knots either: (1) put a tiny drop of a thin adhesive such as Hypo Tube Cement or (2) clear nailpolish. When dry, carefully trim off the excess cords.
Advanced Techniques:
1. Add bead tips for a clean, professional look
For more information on bead knotting, simply do a search on the internet or shop your local book store for jewelry books using this technique. You won't be disappointed by incorporating this technique into your jewelry designs!


